
 Last updated: February 21, 2026
Key Takeaways
- Sound-absorbing materials like rugs, curtains, and upholstered furniture can reduce indoor noise by 25-40% without major renovations
- Strategic placement of bookshelves, plants, and soft furnishings creates natural sound barriers between noisy areas and quiet zones
- White noise machines and soundscaping techniques mask disruptive external sounds more effectively than trying to block them completely
- Weatherstripping doors and windows costs under $50 but dramatically reduces noise infiltration from hallways and streets
- Creating a noise management routine helps maintain peaceful spaces even in apartments, shared housing, or high-traffic neighborhoods
Quick Answer
Quieting Your Home (Even When You Can’t Control the Noise) means using sound-absorbing materials, strategic furniture placement, and masking techniques to create peaceful indoor spaces despite external noise sources like traffic, neighbors, or construction. Renters and homeowners alike can reduce perceived noise levels by 30-50% through affordable interventions like heavy curtains, area rugs, weatherstripping, and white noise devices—without needing landlord permission or expensive renovations.
The upstairs neighbor’s footsteps sound like a herd of elephants. Traffic rumbles past at all hours. The apartment next door hosts what seems like daily drum practice. Sound familiar?
Not everyone has the luxury of controlling their environment completely. Renters can’t tear down walls. Budget-conscious homeowners can’t afford full soundproofing. People living near busy streets, construction zones, or in multi-family buildings face constant noise they didn’t choose and can’t eliminate.
But here’s the thing: Quieting Your Home (Even When You Can’t Control the Noise) doesn’t require permission slips or construction permits. It’s about working smarter with what you’ve got—absorbing sound where it enters, masking what gets through, and creating pockets of peace in an otherwise noisy world.
This guide covers practical, renter-friendly strategies that actually work, from $10 fixes to more substantial investments that still won’t break the bank or your lease agreement.
What Does It Mean to Quiet Your Home When You Can’t Control External Noise?
Quieting your home in uncontrollable noise situations means reducing the impact of sound rather than eliminating its source. Instead of stopping your neighbor’s music or halting street traffic, you’re managing how sound travels through your space, how much gets amplified by hard surfaces, and how your brain perceives the noise that remains.
Sound behaves predictably. Hard surfaces like bare floors, blank walls, and glass windows reflect sound waves, making rooms echo and amplify noise. Soft, porous materials absorb sound energy, converting it to tiny amounts of heat and preventing reverberation. Dense barriers block sound transmission between spaces.
The Three Core Strategies
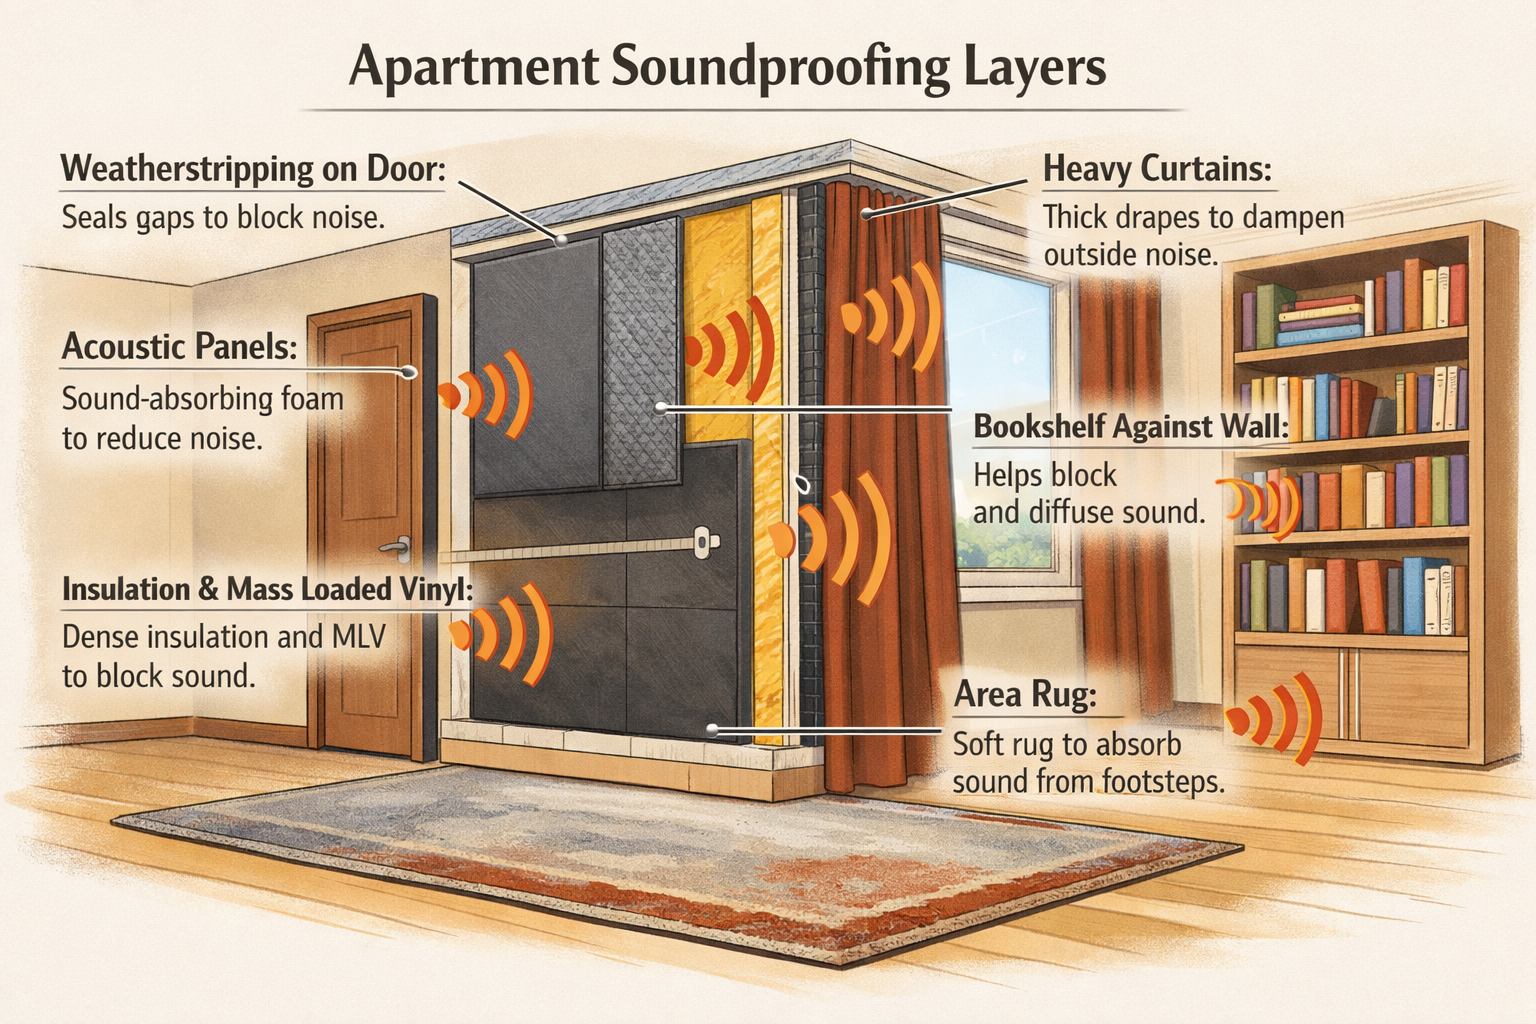
Absorption uses textiles, upholstery, and porous materials to soak up sound waves before they bounce around your room. Think curtains, rugs, cushions, and acoustic panels.
Blocking creates physical barriers that prevent sound from traveling between spaces. Weatherstripping, door sweeps, and strategically placed furniture all serve this purpose.
Masking introduces pleasant background sounds that make disruptive noises less noticeable. White noise machines, fans, and nature soundscapes work on this principle.
Most effective noise management combines all three approaches. A bedroom might use blackout curtains (absorption), weatherstripped doors (blocking), and a white noise machine (masking) to create a sleep sanctuary despite noisy neighbors.
Who Benefits Most
People renting apartments or houses where permanent modifications aren’t allowed get the most value from these techniques. Homeowners on tight budgets also benefit, as do those living temporarily in noisy locations who don’t want to invest in permanent solutions.
Common mistake: Expecting complete silence. The goal isn’t a recording studio—it’s reducing noise to tolerable levels that don’t interfere with sleep, work, or relaxation.
Why Can’t Traditional Soundproofing Work for Everyone?
Traditional soundproofing requires structural changes that most renters can’t make and many homeowners can’t afford. Professional soundproofing involves adding mass to walls (second drywall layers), creating air gaps, installing specialized insulation, and sealing every crack—projects that cost $1,000-$5,000 per room and require contractor expertise.
Lease agreements typically prohibit wall modifications, permanent installations, or anything requiring drilling into studs. Even “minor” changes like mounting acoustic panels with heavy-duty anchors can violate rental terms and cost security deposits.
Budget constraints matter too. A family dealing with street noise might have $200 to spend, not $2,000. Prioritizing which rooms need the most help and using removable, reusable solutions makes sense financially and practically.
The Limitations You’re Working With
Structural access: Can’t open walls to add insulation or create double-wall assemblies.
Permanent fixtures: Can’t install resilient channels, soundproof drywall, or specialized doors.
Shared spaces: Can’t control what happens in adjacent apartments, hallways, or outdoor areas.
Budget caps: Professional soundproofing averages $1,500-$4,000 per room, beyond most budgets.
Choose temporary solutions if: You’re renting, planning to move within 2-3 years, or need immediate relief without major investment. Choose permanent soundproofing if you own your home long-term, have severe noise issues affecting health, and can budget $3,000+ per critical room.
How Do Soft Furnishings and Textiles Reduce Noise?
Soft furnishings absorb sound waves by converting acoustic energy into minimal heat through friction within fibrous materials. When sound hits a hard surface like bare drywall, it bounces back into the room, creating echoes and amplifying noise. When it hits curtains, upholstered furniture, or thick rugs, the sound energy gets trapped in the material’s fibers and dissipates.
The thicker and denser the material, the more sound frequencies it absorbs. A thin cotton curtain might reduce high-frequency sounds (voices, clattering) by 10-15%, while heavy velvet or multi-layer blackout curtains can absorb 30-40% of sound across broader frequency ranges.
Most Effective Textile Solutions
Heavy curtains or drapes: Floor-to-ceiling panels in velvet, suede, or multi-layer blackout fabric work best. Hang them as close to walls as possible and extend rods 6-12 inches beyond window frames to cover more wall surface. Expect to spend $50-$150 per window for quality noise-reducing curtains.
Area rugs and carpet: Thick pile rugs (at least 0.5 inches) with dense padding underneath absorb footstep noise and reduce sound reflection from floors. Wool and synthetic blends perform better than thin cotton. Cover 60-80% of hard flooring in noisy rooms for maximum effect.
Upholstered furniture: Sofas, armchairs, and padded headboards absorb sound better than leather or wood furniture. A fabric sectional sofa can reduce room echo by 15-20% compared to a leather loveseat.
Wall hangings: Tapestries, quilts, or fabric art panels add absorption without drilling. Heavier woven materials work better than thin prints.
Layered bedding: Thick comforters, multiple pillows, and upholstered headboards help bedrooms absorb sound, particularly important for sleep quality.
Placement Strategy
Position soft furnishings on walls shared with noisy neighbors or facing noise sources (windows near traffic). A bookshelf filled with books against a shared wall, topped with fabric storage boxes, creates both mass and absorption.
Common mistake: Spreading thin textiles around the room. One thick rug is more effective than three thin ones. Concentrate absorption where noise enters or reflects most.
What Are the Best Door and Window Sealing Techniques?
Gaps around doors and windows account for 30-50% of noise infiltration in most homes. Sound travels through air, so any opening that lets drafts through also lets noise through. Sealing these gaps costs $20-$100 per room but delivers immediate, noticeable results.
Door Weatherstripping and Sweeps
Adhesive foam weatherstripping: Apply to door frames where the door meets the jamb. V-strip or bulb-style weatherstripping creates better seals than flat foam. Replace annually as compression reduces effectiveness. Cost: $8-$15 per door.
Door sweeps: Attach to the bottom of doors to seal the gap between door and floor. Adjustable sweeps work best for uneven floors. Under-door draft stoppers (fabric tubes filled with sand or foam) offer removable alternatives for renters. Cost: $10-$25 per door.
Threshold seals: If you can modify the door bottom, add a threshold seal that compresses when the door closes. These provide superior sound blocking but require minor installation.
Window Sealing Methods
Rope caulk: Removable putty-like material pressed into gaps between window frames and walls. Peels off cleanly without damage, perfect for renters. Reapply each season. Cost: $5-$10 per window.
Magnetic weatherstripping: For metal window frames, magnetic strips create tight seals without adhesive. Cost: $12-$20 per window.
Window inserts: Acrylic or foam panels that fit inside window frames, creating an air gap that blocks sound. More expensive ($50-$150 per window) but highly effective and removable.
Thermal curtains: When hung properly (close to wall, extending beyond frame), heavy thermal or blackout curtains add a sound-dampening layer even if windows aren’t perfectly sealed.
Testing Your Seals
Light a candle or incense stick and move it around door and window edges. Flickering indicates air (and sound) leaks. Mark these spots and seal them first for maximum impact.
Edge case: Old buildings with settling or warped frames may need multiple weatherstripping layers or professional-grade seals to achieve good results.
How Can Furniture Placement Help With Quieting Your Home?
Strategic furniture placement creates physical barriers that block, absorb, or redirect sound waves. Dense, tall furniture positioned between noise sources and quiet zones reduces sound transmission by adding mass and disrupting direct sound paths.
The Sound Barrier Principle
Sound travels in straight lines until it hits an obstacle. A bookshelf full of books against a shared wall adds mass (books are dense) and irregular surfaces (book spines) that disrupt sound waves. This won’t eliminate neighbor noise but can reduce it by 15-25%.
Bookshelves: Place floor-to-ceiling units against walls shared with noisy neighbors. Fill completely with books, storage boxes, or a mix of items. The fuller and denser, the better. Leave minimal empty space.
Wardrobes and dressers: Position large furniture pieces against noise-source walls. Clothes inside add additional sound absorption. A full wardrobe provides better sound blocking than an empty one.
Headboards and bed placement: In bedrooms, position upholstered headboards against shared walls. If possible, avoid placing the head of your bed directly against walls where neighbor noise is loudest.
Creating Quiet Zones
Arrange furniture to create distance between noise sources and where you spend time. In studio apartments, position your bed as far from the entry door and shared walls as possible, using furniture to create a “hallway” effect that sound must travel through.
Sectional sofas: Use L-shaped or U-shaped seating to create enclosed conversation areas that feel quieter than open floor plans.
Room dividers: Folding screens, tall plants, or bookshelf dividers break up sound paths in open spaces. While not soundproof, they reduce the perception of noise by creating visual and acoustic separation.
Avoiding Sound Amplification
Don’t push all furniture against walls, leaving the center empty. This creates an echo chamber effect. Mix furniture placement—some against walls, some floating in the space—to break up sound reflection patterns.
Common mistake: Placing hard furniture (glass tables, metal shelving) near noise sources. These reflect sound rather than absorbing it, amplifying the problem.
What Role Do White Noise and Sound Masking Play?
White noise and sound masking don’t reduce actual noise levels—they make disruptive sounds less noticeable by filling the acoustic environment with consistent, neutral sound. Your brain filters constant background noise more easily than intermittent, unpredictable sounds like footsteps, voices, or traffic.
How Sound Masking Works
Human hearing is comparative. In complete silence, a whisper sounds loud. With background noise present, the same whisper becomes inaudible. White noise machines produce consistent sound across all frequencies, creating an acoustic “blanket” that masks irregular noises.
White noise: Equal intensity across all frequencies, sounds like static or rushing air. Best for masking high-frequency sounds (voices, footsteps).
Pink noise: More emphasis on lower frequencies, sounds like steady rainfall or wind. Many people find it more pleasant than white noise for sleep.
Brown noise: Even more low-frequency emphasis, sounds like a waterfall or strong wind. Effective for masking rumbling traffic or bass-heavy music from neighbors.
Effective Sound Masking Tools
Dedicated white noise machines: Devices like LectroFan or Dohm produce consistent, customizable sounds. Quality machines cost $40-$80 and offer multiple sound options. Place them between you and the noise source, or near your bed for sleep.
Fans: Box fans or tower fans create natural white noise while circulating air. A 20-inch box fan produces sound levels around 50-60 decibels, enough to mask moderate noise. Cost: $20-$40.
Apps and streaming: White noise apps (myNoise, Noisli) or YouTube channels offer free sound masking. Use a Bluetooth speaker for better sound quality than phone speakers. Works well for testing before buying dedicated devices.
HVAC systems: Continuous-run fan settings on heating/cooling systems provide free white noise. Set your thermostat fan to “on” instead of “auto.”
Strategic Placement and Volume
Position sound masking devices between you and the noise source when possible. For sleep, place white noise machines 3-6 feet from your bed at a volume just loud enough to mask disruptive sounds—not so loud it becomes disruptive itself.
Choose white noise if: You need consistent masking for sleep, work focus, or relaxation. Choose targeted soundproofing if noise levels are extreme (above 70-80 decibels consistently) or if white noise bothers you.
Edge case: Some people find white noise irritating or have tinnitus that worsens with constant background sound. Try pink or brown noise alternatives, or nature sounds like rainfall.
What Budget-Friendly Materials Absorb Sound Effectively?
Sound absorption doesn’t require expensive acoustic panels. Many household items and affordable materials provide significant noise reduction when used strategically.
DIY Sound Absorption Materials
Moving blankets: Heavy-duty furniture blankets (used by movers) cost $10-$25 each and absorb sound remarkably well. Hang them on walls using removable hooks or tension rods. They’re not attractive but work great in closets, home offices, or behind decorative fabric.
Foam mattress toppers: Cut egg-crate foam mattress toppers into panels and attach to walls with removable adhesive strips. A queen-size topper ($30-$50) covers significant wall space. Cover with fabric for better aesthetics.
Thick blankets and quilts: Layer heavy blankets on walls, over doors, or as room dividers. Wool and fleece absorb sound better than cotton. Hang using tension rods or removable hooks.
Cardboard egg cartons: Despite popular belief, egg cartons provide minimal sound absorption. They’re better than nothing but far less effective than actual foam or fabric.
Cork boards: Cork tiles or rolls (sold for bulletin boards) absorb sound moderately well. Install with removable adhesive. Cost: $20-$40 for enough to cover a 4×6 foot area.
Affordable Acoustic Panels
Foam panels: Basic acoustic foam panels cost $20-$40 for a 12-pack. They won’t block sound but reduce echo and reverberation within rooms. Use removable adhesive strips rated for the panel weight.
Fabric-wrapped panels: DIY panels using wood frames, rockwool insulation, and fabric cost $15-$25 per 2×4 foot panel. They outperform foam and look better. Hang with picture hanging strips.
Acoustic curtains: Purpose-made sound-dampening curtains ($60-$120 per panel) contain mass-loaded vinyl or dense fiber layers. More effective than regular curtains but pricier.
Natural Sound Absorbers
Plants: Large leafy plants absorb and diffract sound waves. A room with 5-6 substantial plants shows measurable noise reduction compared to empty rooms. Plants also improve air quality and aesthetics.
Bookshelves filled with books: Books are dense and irregular, making them excellent sound absorbers. A full 6-foot bookshelf can reduce noise reflection by 20-30%.
Cost Comparison Table
| Material | Coverage Area | Cost | Effectiveness | Renter-Friendly |
|---|---|---|---|---|
| Moving blankets | 6×7 ft per blanket | $10-$25 | High | Yes |
| Area rug (8×10) | 80 sq ft | $100-$300 | High | Yes |
| Foam panels (12-pack) | 48 sq ft | $25-$40 | Moderate | Yes (removable adhesive) |
| Heavy curtains | Per window | $50-$150 | High | Yes |
| Door weatherstripping | Per door | $8-$15 | Very High | Yes |
| White noise machine | N/A | $40-$80 | High (masking) | Yes |
| DIY fabric panels | 8 sq ft per panel | $15-$25 | High | Yes (if hung properly) |
Common mistake: Buying expensive “soundproofing” products marketed with exaggerated claims. Mass-loaded vinyl, acoustic foam, and specialty panels help but won’t create silence. Spend money on proven basics (rugs, curtains, weatherstripping) before specialty items.
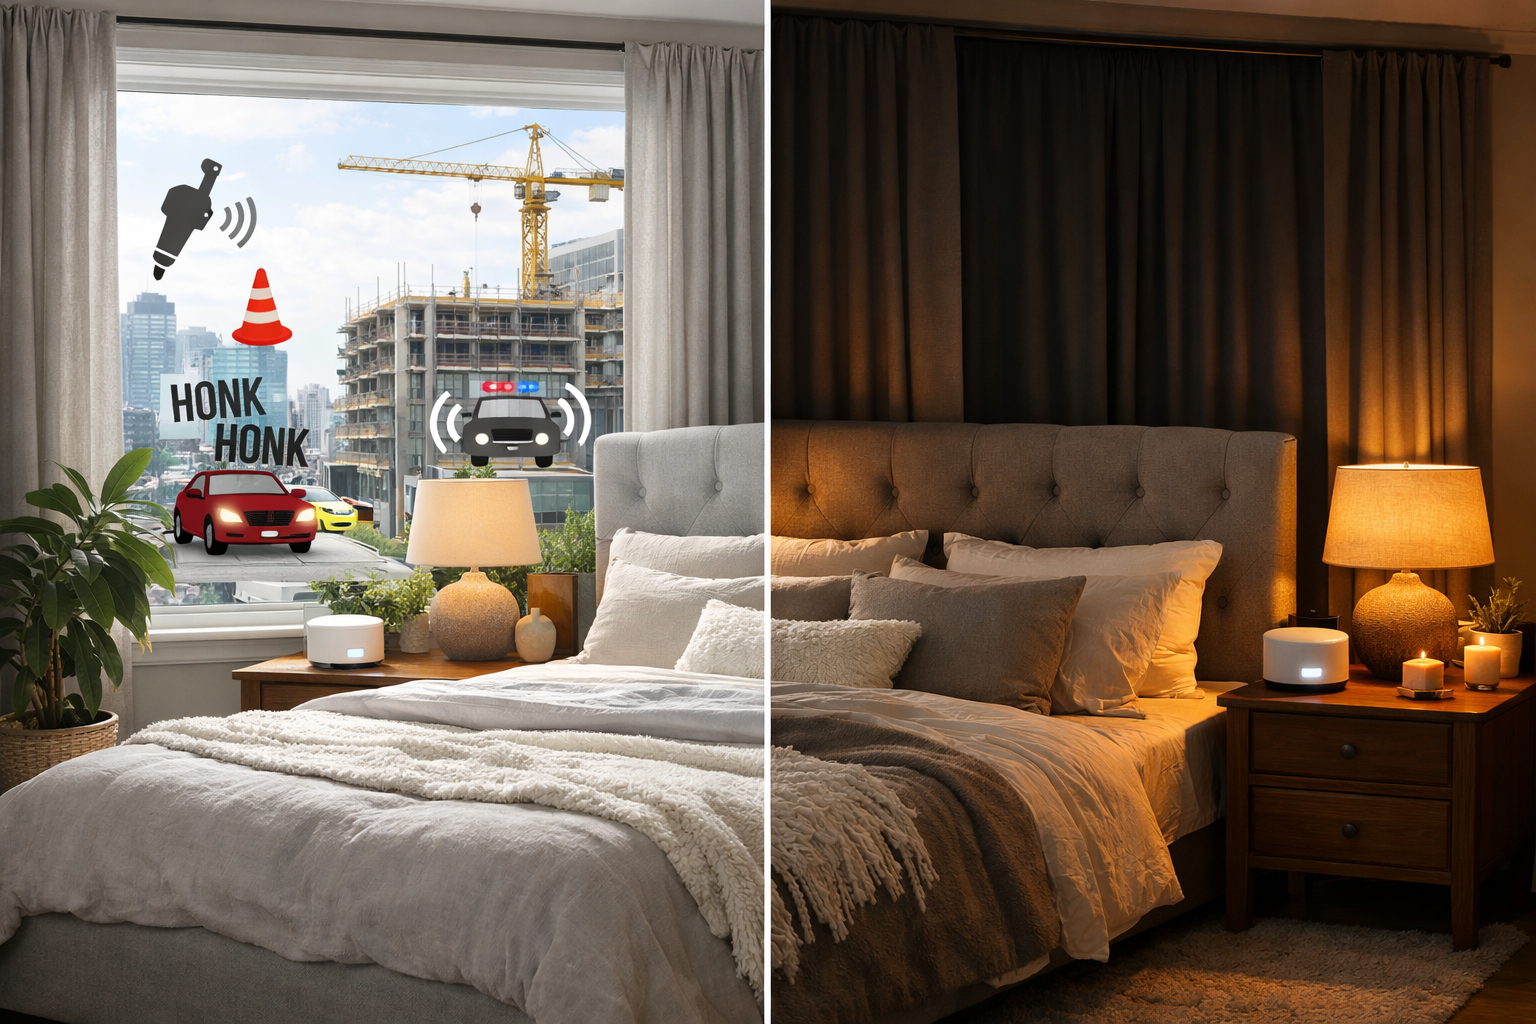
How Do You Create a Quiet Bedroom Despite External Noise?
Bedrooms require special attention because sleep quality suffers most from noise disruption. Creating a bedroom sanctuary combines multiple noise-reduction strategies focused on the sleep environment.
The Bedroom Noise Management System
Start with the door: Install weatherstripping around the frame and add a door sweep at the bottom. This single step can reduce hallway noise by 40-50%. If the door is hollow-core, hang a heavy blanket or moving blanket on the back using over-door hooks.
Seal the windows: Apply rope caulk to window gaps and hang heavy blackout curtains. Curtains should extend 6+ inches beyond the window frame on all sides and hang close to the wall. For extreme noise, add a window insert behind the curtains.
Address the floor: Place a thick area rug (with padding) covering at least 70% of the floor. This absorbs noise from below and reduces sound reflection within the room.
Position the bed strategically: Place the headboard against the quietest wall, typically an exterior wall rather than one shared with neighbors. Use an upholstered headboard for additional sound absorption.
Add white noise: Position a white noise machine or fan on the side of the bed nearest the noise source. Set volume to mask disruptive sounds without being loud enough to disturb sleep.
Layered Sound Absorption
Wall treatments: Hang tapestries, quilts, or acoustic panels on walls facing noise sources. Behind the headboard is ideal for both aesthetics and function.
Soft furnishings: Include upholstered furniture (reading chair, ottoman), multiple pillows, and thick bedding. Each element adds absorption.
Closet as buffer: If your closet shares a wall with a noisy neighbor, keep it full of clothes. The fabric and enclosed space create a natural sound buffer.
The Sleep-Focused Approach
Blackout and quiet go together: Light and noise both disrupt sleep. Heavy blackout curtains that block light also block significant noise.
Temperature control: White noise from a fan serves double duty, masking sound while maintaining comfortable sleep temperature.
Consistency matters: Use the same white noise or sound masking every night. Your brain learns to filter consistent background sound, making it more effective over time.
Edge case: If you share a bedroom with a partner who dislikes white noise, try a pillow speaker (small speaker that goes under your pillow) or sleep headphones designed for side sleepers.
Apartments and shared housing present unique challenges—noise comes from multiple directions (above, below, beside), and modification options are limited. Effective noise management in these situations requires prioritizing the most disruptive noise sources and using removable solutions.
Addressing Upstairs Neighbor Noise
Footsteps, dropped items, and moving furniture from above are among the most common and frustrating noise complaints. Unfortunately, you can’t soundproof your ceiling without major renovations.
Ceiling solutions: Hanging acoustic panels or fabric from the ceiling helps minimally. The better approach is masking and absorption elsewhere in the room.
Focus on your space: Add thick rugs, soft furniture, and wall hangings that absorb sound bouncing around the room. This won’t stop ceiling noise but reduces overall noise levels.
White noise: Position a white noise machine or fan to mask footstep patterns. Brown noise (lower frequency) works better for heavy footsteps than white noise.
Diplomatic approach: If noise is excessive (late-night parties, heavy furniture moving at 2 AM), politely talk with neighbors or involve property management. Sometimes people don’t realize how much noise travels.
Walls between apartments often lack adequate sound insulation. Voices, TV noise, and music travel easily through standard construction.
Furniture barriers: Place bookshelves, wardrobes, or dressers against shared walls. Fill bookshelves completely—books add mass that blocks sound.
Wall hangings: Hang heavy tapestries, quilts, or moving blankets on shared walls. Use removable adhesive hooks or tension rods if nails aren’t allowed.
Rearrange your space: Move your bed, desk, or main living area away from the noisiest shared walls. Even 3-4 feet of distance reduces perceived noise.
Acoustic panels: If aesthetics matter, invest in decorative acoustic panels designed to look like art. They’re more effective than bare walls and lease-friendly when hung with proper adhesive strips.
Dealing With Hallway and Common Area Noise
Entry doors often have large gaps that let hallway conversations, footsteps, and door slamming into your apartment.
Door sealing: Weatherstrip the entire door frame and add a door sweep. This is the single most effective intervention for hallway noise.
Door curtain: Hang a heavy curtain on the interior side of the door using a tension rod. This adds a sound-absorbing layer and creates an air gap.
Entry area buffer: Arrange furniture to create an “entry zone” that sound must pass through before reaching living spaces. A coat rack, shoe storage, or small bookshelf near the door helps.
Soundproofing Priorities for Renters
- Weatherstrip all doors and windows ($30-$60 total, huge impact)
- Add thick rugs to main living areas ($100-$300, addresses floor noise and room acoustics)
- Hang heavy curtains ($100-$300, reduces window noise and adds absorption)
- Position furniture strategically (free, blocks and absorbs sound)
- Add white noise machine ($40-$80, masks remaining noise)
- Apply acoustic panels to problem walls ($50-$150, targeted absorption)
Choose this approach if: You rent, plan to move within 1-3 years, or have a limited budget. All these solutions are removable and reusable in your next home.
How Do You Maintain Your Noise Reduction Setup?
Noise reduction materials degrade over time, and effectiveness diminishes without maintenance. Regular upkeep ensures your quiet home stays quiet.
Quarterly Maintenance Tasks
Check weatherstripping: Inspect door and window weatherstripping every 3-4 months. Compressed or torn weatherstripping loses effectiveness. Replace as needed (typically annually for doors, every 2 years for windows).
Refresh rope caulk: Window rope caulk hardens and loses adhesion over time, especially with temperature changes. Remove and reapply each season for best results.
Clean textiles: Dust and debris in curtains, rugs, and upholstered furniture reduce sound absorption. Vacuum curtains and rugs monthly. Professional cleaning annually maintains absorption properties.
Test door sweeps: Door sweeps shift position or wear down. Ensure they maintain contact with the floor without dragging excessively.
Seasonal Adjustments
Winter: Cold weather makes materials contract, creating new gaps. Recheck all seals and add extra weatherstripping if needed. Heavier curtains provide both sound blocking and insulation.
Summer: Heat and humidity can loosen adhesive on acoustic panels or weatherstripping. Inspect and reattach as needed.
When to Upgrade
Weatherstripping lasts: 1-2 years for adhesive foam, 3-5 years for higher-quality rubber or silicone types.
Curtains and rugs: Quality textiles maintain effectiveness for years but should be cleaned regularly. Replace when fabric thins or tears.
White noise machines: Electronic devices last 3-5 years typically. If sound quality degrades or controls fail, replace rather than repair.
Acoustic panels: Foam panels compress over time (3-5 years). Fabric-wrapped panels with rigid insulation last 10+ years.
Measuring Effectiveness
The conversation test: Can you hold a normal conversation without raising your voice when external noise is present? If yes, your setup is working.
Sleep quality: Are you waking less frequently due to noise? Falling asleep faster? Better sleep quality indicates effective noise management.
Decibel meter apps: Free smartphone apps measure sound levels. Test noise levels before and after interventions. A 10-decibel reduction is noticeable; 20+ decibels is significant.
Common mistake: Installing everything at once and not knowing what works. Add solutions one at a time when possible, testing effectiveness before adding more. This helps you prioritize spending and effort.
Frequently Asked Questions
Can you soundproof a room without damaging walls?
Yes, using removable solutions like heavy curtains, weatherstripping, area rugs, acoustic panels with adhesive strips, and strategic furniture placement. These methods reduce noise by 30-50% without drilling or permanent modifications.
What’s the cheapest way to reduce noise in an apartment?
Weatherstripping doors ($8-$15) and adding a door sweep ($10-$25) provides the most noise reduction per dollar spent. A white noise machine ($40-$80) or box fan ($20-$30) for masking is the second-best budget option.
Do egg cartons actually work for soundproofing?
No, egg cartons provide minimal sound absorption despite popular belief. They might reduce slight echo but won’t block noise. Use moving blankets, foam panels, or thick curtains instead for actual results.
How much difference does a rug make for noise?
A thick area rug with quality padding can reduce floor-reflected noise by 25-35% and footstep noise transmission to downstairs neighbors by 40-60%. Larger rugs covering more floor area provide better results.
Will white noise disturb my sleep?
Most people adapt to consistent white noise within 3-7 nights, and it improves sleep quality by masking disruptive sounds. Start at low volume and increase gradually. Pink or brown noise may be more pleasant if white noise feels harsh.
Can I soundproof windows without replacing them?
Yes, using window inserts (acrylic panels that fit in the frame), heavy multi-layer curtains, rope caulk for gaps, and weatherstripping. This combination can reduce window noise by 50-70% without window replacement.
How do I stop hearing my upstairs neighbors?
You can’t block ceiling noise effectively without major renovation, but you can reduce its impact by using brown noise masking, adding sound-absorbing materials throughout the room (rugs, curtains, soft furniture), and rearranging your space to avoid spending time directly under the noisiest areas.
What’s the difference between soundproofing and sound dampening?
Soundproofing blocks sound transmission between spaces (requires adding mass, creating air gaps, and sealing). Sound dampening reduces echo and reverberation within a space using absorptive materials. Most renter-friendly solutions are sound dampening, not true soundproofing.
Do acoustic panels really work?
Acoustic panels reduce echo and reverberation within a room by 40-60% but don’t block sound from entering. They make rooms sound quieter and clearer but won’t stop neighbor noise from coming through walls.
How thick should curtains be to block noise?
Effective noise-reducing curtains should be at least 0.5 inches thick, multi-layered, and made from dense materials like velvet, suede, or specialized acoustic fabric. Triple-weave blackout curtains typically provide the best noise reduction.
Can plants actually reduce noise?
Yes, large leafy plants absorb and diffract sound waves. A room with 5-7 substantial plants shows measurable noise reduction (10-15%) compared to empty rooms, though the effect is modest compared to textiles or weatherstripping.
Is it worth getting a white noise machine or just using a fan?
White noise machines offer more sound options, consistent volume, and compact size, but quality fans work nearly as well for masking and cost less. Choose based on whether you want cooling along with noise masking (fan) or just sound (machine).
Key Takeaways
- Weatherstripping doors and windows delivers the highest noise reduction per dollar spent, often cutting infiltration noise by 40-60% for under $50 per room
- Heavy textiles (curtains, rugs, upholstered furniture) absorb sound waves and reduce echo, making rooms feel 30-40% quieter without permanent modifications
- Strategic furniture placement creates physical barriers—bookshelves against shared walls, wardrobes near noise sources—that block and disrupt sound transmission
- White noise and sound masking don’t reduce actual noise levels but make disruptive sounds less noticeable by filling the acoustic environment with consistent background sound
- Combination approaches work best—sealing gaps, adding absorption, using masking, and arranging furniture together create cumulative effects that single solutions can’t match
- Budget-friendly materials like moving blankets, foam mattress toppers, and rope caulk perform nearly as well as expensive acoustic products when used correctly
- Maintenance matters—weatherstripping needs annual replacement, textiles require regular cleaning, and seals need seasonal adjustment to maintain effectiveness
- Realistic expectations prevent frustration—aim for 30-50% noise reduction and improved sleep quality, not complete silence
- Renter-friendly solutions using removable adhesives, tension rods, and freestanding furniture protect security deposits while creating quieter spaces
- Prioritize sleep spaces first, as bedroom noise has the greatest impact on health and well-being, then address work and living areas
Conclusion
Quieting Your Home (Even When You Can’t Control the Noise) isn’t about achieving perfect silence—it’s about creating functional peace in imperfect circumstances. The apartment dweller can’t eliminate upstairs footsteps, but strategic use of white noise, sound-absorbing textiles, and sealed doors can reduce their impact from sleep-disrupting to barely noticeable.
The beauty of these approaches lies in their accessibility. A $15 door sweep and $30 in weatherstripping often delivers more noticeable improvement than $300 in acoustic panels. Heavy curtains you’d buy anyway for privacy double as sound barriers. The bookshelf you already own becomes a noise blocker when repositioned against a shared wall.
Start with the fundamentals: seal your doors and windows, add thick rugs to hard floors, and hang substantial curtains. These three interventions alone typically reduce perceived noise by 30-40%. Then layer in white noise for masking, position furniture strategically, and add targeted absorption where specific noise problems persist.
Your next steps:
- Identify your primary noise sources (neighbors, traffic, hallways) and the rooms most affected
- Seal all doors and windows in priority rooms using weatherstripping and door sweeps
- Add one substantial textile element to each priority room (thick rug, heavy curtains, or upholstered furniture)
- Test a white noise solution (machine, fan, or app) to find what works for your sleep and work needs
- Reposition furniture to create barriers between noise sources and your main activity areas
- Evaluate results after one week, then add additional absorption or masking as needed
The noise you can’t control doesn’t have to control your comfort. With $100-$300 and a weekend of effort, most people can transform a disruptively noisy space into one that supports rest, focus, and relaxation. The solutions are removable, reusable, and renter-friendly—ready to move with you to your next home.
Your peaceful space is possible, even when the world outside (and next door, and upstairs) refuses to quiet down.